
Your first app, in C
Read kit_hello.c line by line (a slider and a button in a native window) and learn the kit's five ideas: nodes, properties, geometry managers, the host and the window loop.
- 20 minutes
- Intermediate
- C
Every BUI app, whatever language it’s written in, ends up as calls into one small C library: the kit. Using it directly is the most hands-on way to see how BUI works, and it’s what you’d use to bring BUI to a new language.
This tutorial reads examples/kit_hello.c from top to bottom. It’s about 60 lines, and it shows the five ideas the whole kit is built on.
Build and run it
cmake -S . -B build -DBUI_BUILD_EXAMPLES=ONcmake --build build --target bui_kit_helloThen run bui_kit_hello from the build folder. A small window opens with a Size slider and an Apply button. Drag the slider and watch your terminal: every change prints a line, and so does each click.
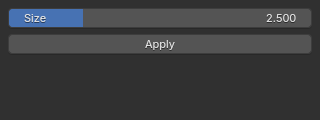
kit_hello.c, rendered headless at 320 × 120. (Made with the same kit calls, rendered headless without compiling the example.)The code, line by line
-
Include the header.
#include <stdio.h>#include "BUI_kit.h"BUI_kit.his the whole public API, and it doubles as the reference: every function has a one-line comment. In CMake, linkingbui::kitgives you the header and the library. -
Write an event callback.
static void on_event(void *data, BKNode *node, int kind, void *ref, double a, double b){if (kind == BK_EV_CLICK) {printf("clicked %s\n", BK_get_str(node, "text"));}else if (kind == BK_EV_CHANGE) {printf("%s = %g\n", BK_get_str(node, "label"), BK_get_num(node, "value"));}}The kit tells you about everything through one function.
nodeis the widget it’s about, andkindsays what happened:BK_EV_CLICKfor a button,BK_EV_CHANGEwhen a value changed. Others includeBK_EV_CALL(a menu item or hotkey),BK_EV_RENAMEandBK_EV_SUBMIT.a,bandrefcarry extra details for some kinds. -
Create the root node.
BKNode *root = BK_node_new("frame");BK_set_num(root, "padding", 8);Idea one, nodes: everything on screen is a node, made by type name. A
frameis a container. Others areslider,button,checkbox,text,panel,tree,canvasand many more; the header lists them all.Idea two, properties: you configure nodes by name, with
BK_set_num,BK_set_str,BK_set_colorandBK_set_strs, and read them back withBK_get_*. Here, 8 pixels of padding. -
Add a slider, packed.
BKNode *size = BK_node_new("slider");BK_set_str(size, "label", "Size");BK_set_num(size, "min", 0);BK_set_num(size, "max", 10);BK_set_num(size, "value", 2.5);BK_node_add(root, size, -1); /* -1: append */BK_geom_set_manager(size, BK_GEOM_PACK); /* Tk's packer */BK_geom_set(size, "fill", 1); /* fill x */BK_node_add(parent, child, index)puts the slider in the frame;-1appends.- Idea three, geometry managers: a child of a frame is placed by a manager, exactly as in Tk.
BK_GEOM_PACKis a C port of Tk’s packer;BK_GEOM_GRIDandBK_GEOM_PLACEare the other two. BK_geom_setsets the manager’s options by name. For the packer,fillis 1 for x, 2 for y and 3 for both.
-
Add a button.
BKNode *apply = BK_node_new("button");BK_set_str(apply, "text", "Apply");BK_node_add(root, apply, -1);BK_geom_set_manager(apply, BK_GEOM_PACK);BK_geom_set(apply, "fill", 1);BK_geom_set(apply, "pady0", 6);The same pattern.
pady0is the padding above the button (pady1would be below), so it sits 6 pixels under the slider. -
Make a context and connect your callback.
BKContext *ctx = BK_context_new(root);BKHost host = {0};host.emit = on_event;BK_context_set_host(ctx, &host);Idea four, the context and the host. A
BKContextowns a tree’s live state: input, hover, focus, popups and undo. TheBKHostis how the context talks back to whoever runs it:emitfor events, plusrequest(please render),set_cursor,warp, the clipboard andschedulefor timers.You only fill in
emit. The window you’re about to open supplies the rest, and keeps youremit. -
Open a window and run the loop.
if (BK_window_supported()) {BKWindow *win = BK_window_new(ctx, "BUI from C", 320, 120);BK_window_show(win);BK_window_run();BK_window_free(win);}Idea five, the window loop.
BK_window_newputs the context in a native window: Win32 on Windows, X11 on Linux, Cocoa on macOS (still experimental).BK_window_runhandles messages until every window is closed. From then on, input goes in, frames come out, and only the changed parts of the window are redrawn, all without leaving C. -
Or render without a window.
else {BuiRaster *r = BUI_raster_create(320, 120);BK_render(ctx, r, 320, 120, 1);BUI_raster_free(r);}Where there’s no window system, the example renders one frame into a raster, an image in memory.
BK_render(ctx, raster, w, h, full)returns how many regions it redrew; 0 means nothing changed. This is also how you’d test a UI or take a screenshot. -
Clean up.
BK_context_free(ctx);BK_node_free(root);return 0;Free the context first, then the tree.
Going further
- Drive input yourself. Without a window, feed the context with
BK_press,BK_motion,BK_release,BK_keyandBK_wheel, then callBK_render. That’s how BUI’s own tests work. - Use the GPU. Call
BUI_gpu_set_default(1)before opening windows, orBK_window_set_gpu(win, 1)for one window. Or setBUI_GPU=1without changing code. - Draw your own widget. A
customnode draws and handles input itself. Dear ImGui runs on BUI that way.
Next steps
Last updated