
Run a tkinter app on BUI
Take a plain tkinter program, run it on BUI without changing a line, then give it Blender's panels, sliders and number fields on purpose.
- 10 minutes
- Beginner
- Python
You already have a tkinter app, or you know how to write one. In the next ten minutes you’ll run it on BUI without changing a line, and it will come out looking and behaving like Blender.
Then you’ll learn which tkinter widgets turn into which Blender widgets, so you can design for that look on purpose.
The app
Here’s a small, ordinary tkinter program: a render-settings form with a text entry, a spin box, a slider, a dropdown, a checkbox and a button. There’s no BUI in it anywhere.
import tkinter as tkfrom tkinter import ttk, messagebox
root = tk.Tk()root.title("Render settings")
panel = ttk.LabelFrame(root, text="Output")panel.pack(fill="x", padx=6, pady=6)
name = tk.StringVar(value="shot_010")samples = tk.IntVar(value=128)denoise = tk.BooleanVar(value=True)
ttk.Label(panel, text="Name").grid(row=0, column=0, sticky="e", padx=4, pady=2)ttk.Entry(panel, textvariable=name).grid(row=0, column=1, sticky="we", pady=2)
ttk.Label(panel, text="Samples").grid(row=1, column=0, sticky="e", padx=4, pady=2)tk.Spinbox(panel, from_=1, to=4096, textvariable=samples).grid(    row=1, column=1, sticky="we", pady=2)
ttk.Label(panel, text="Quality").grid(row=2, column=0, sticky="e", padx=4, pady=2)quality = tk.Scale(panel, from_=0, to=100, orient="horizontal")quality.set(90)quality.grid(row=2, column=1, sticky="we", pady=2)
ttk.Label(panel, text="Format").grid(row=3, column=0, sticky="e", padx=4, pady=2)fmt = ttk.Combobox(panel, values=("PNG", "JPEG", "OpenEXR"), state="readonly")fmt.current(0)fmt.grid(row=3, column=1, sticky="we", pady=2)
ttk.Checkbutton(panel, text="Denoise", variable=denoise).grid(    row=4, column=1, sticky="w", pady=2)panel.columnconfigure(1, weight=1)
def render():    messagebox.showinfo("Render", "%s: %d samples, %d%% %s" % (        name.get(), samples.get(), quality.get(), fmt.get()))
ttk.Button(root, text="Render", command=render).pack(fill="x", padx=6, pady=(0, 6))root.mainloop()
Run it three ways
-
Run it the usual way, for comparison.
python render_settings.pyYou get the classic Tk window. Close it.
-
Run it on BUI, unchanged.
blenderui-tk render_settings.pySame file, same code, but now drawn by BUI.
blenderui-tkcomes withpip install blenderui. It makesimport tkinter(andtkinter.ttk,tkinter.messageboxand the other submodules) point to BUI, then runs your script. Anything after the script’s name is passed to it insys.argv, as usual.If the
blenderui-tkcommand isn’t on yourPATH, this does the same thing:python -m bui.tksyntax render_settings.py -
Or switch inside the program.
When you’d rather start the app with plain
python, callinstall()before the firstimport tkinter:render_settings.py import blenderui.tksyntaxblenderui.tksyntax.install() # before the first `import tkinter`import tkinter as tkfrom tkinter import ttk, messageboxFrom then on, every
import tkinterin the process, including inside libraries you use, gets BUI. -
Or import it by name.
For new code that’s meant for BUI, import BUI’s tkinter directly and skip the switch:
import blenderui.tksyntax as tkfrom blenderui.tksyntax import ttk, messageboxThe names and behaviour are tkinter’s, so the rest of the file stays the same.
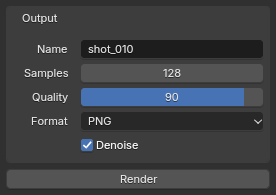
render_settings.py on BUI, unchanged. The LabelFrame became a panel, the Spinbox a number field and the Scale a slider.Play with it
None of this needed extra code. It’s Blender’s behaviour, built into the widgets BUI draws:
- Drag the Samples field sideways. The cursor hides and the number scrubs. Hold Shift for fine steps, Ctrl to snap.
- Click the Quality slider and type
75, or100/3, then press Enter. Sliders and number fields are Blender’s, so they accept math. A plainEntrystays a text field and takes text as typed. - Press Ctrl+Z to undo the last edit, and Ctrl+Shift+Z to redo.
- Press Tab while editing a field to jump to the next one.
- Click Render. The message box is a Blender-styled dialog, and
showinforeturns"ok"just like tkinter’s.
Which widget becomes what
You don’t choose the look: it always comes from Blender’s theme. But some tkinter widgets have a natural Blender twin, and BUI uses it:
| You write | You get |
|---|---|
ttk.LabelFrame |
A Blender panel |
tk.Spinbox |
A Blender number field |
tk.Scale, ttk.Scale |
A Blender slider |
ttk.Combobox, tk.OptionMenu |
A Blender dropdown (enum menu) |
tk.Checkbutton(indicatoron=0) |
A Blender toggle button |
tk.Menu on the root |
A Blender menu bar |
ttk.Scrollbar |
A Blender scroller that speaks Tk’s scrollbar protocol |
So if you want a Blender-style tool, reach for LabelFrame to group settings and Spinbox for numbers. A plain Entry holding a number is still just a text field.
Options that only change Tk’s own look, like relief, borderwidth, highlightthickness, activebackground and ttk.Style settings, are accepted and returned by cget, but they don’t change what’s drawn. These do apply: bg on frames, canvases and windows, fg on text, font (size and bold), cursor, width and height, image and state.
A bigger example
The repository has a fuller unchanged app with a menu bar, a notebook with three tabs, a Treeview table, a Text widget with tags and a Canvas:
blenderui-tk examples/tk_unchanged_app.py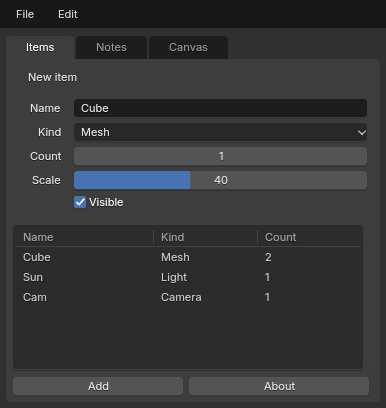
examples/tk_unchanged_app.py: plain tkinter, no BUI imports.If something looks different
BUI follows Tk’s rules and checks them against the real tkinter in its tests, so differences are bugs. A few Tk rules surprise people anyway, on any toolkit: Text.get("1.0", "end") ends with a newline (use "end-1c"), and menus keep a tear-off entry at index 0 unless you pass tearoff=0. The tkinter guide lists these, plus the few things BUI can’t do (there’s no Tcl interpreter, so root.tk.call only knows a handful of commands).
Next steps
Last updated