
Your first app, with Dear ImGui
Run the real Dear ImGui on BUI from Python and C++, in Blender's theme, then switch on Blender's widgets with one build flag.
- 10 minutes
- Dear ImGui
- Python
- C++
Dear ImGui is a popular immediate-mode UI library for tools, editors and debug panels. BUI runs the real Dear ImGui, not a look-alike, so your existing ImGui code works unchanged. What changes is everything around it: BUI gives it a native window, draws it with its own renderers, and dresses it in Blender’s theme and font.
In this tutorial you’ll write a small ImGui window in Python, run ImGui’s famous demo from C++, and then see the build where ImGui’s widgets become Blender’s widgets.
Python: a window in 20 lines
You need pip install blenderui (installation); Dear ImGui comes with it.
-
Write a frame function.
imgui_hello.py import blenderui.imgui as imguistate = {"value": 0.5, "name": "Suzanne", "color": (0.28, 0.45, 0.70),"clicks": 0, "demo": False}def frame():if state["demo"]:imgui.show_demo_window()imgui.begin("Hello")_, state["value"] = imgui.slider_float("Value", state["value"], 0.0, 1.0)_, state["name"] = imgui.input_text("Name", state["name"])_, state["color"] = imgui.color_edit3("Color", state["color"])if imgui.button("Click me"):state["clicks"] += 1imgui.same_line()imgui.text("clicked %d times" % state["clicks"])_, state["demo"] = imgui.checkbox("Show the demo window", state["demo"])imgui.end()if __name__ == "__main__":imgui.run(frame, title="Hello, ImGui", size=(800, 600)) -
Run it.
python imgui_hello.pyDrag the slider, type a name, click the color to open ImGui’s picker, and tick the checkbox to open ImGui’s whole demo window.
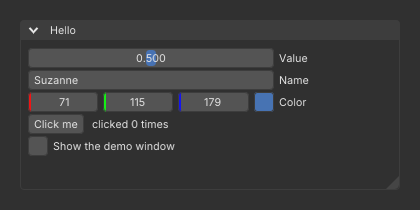
imgui_hello.py, rendered headless: Dear ImGui's own widgets in Blender's theme and font.How the Python API reads:
- Functions are snake_case:
ImGui::SliderFloatisimgui.slider_float. - In/out values come back: you pass the current value and get
(changed, new_value). That’s the pyimgui convention, so pyimgui code ports easily. imgui.run(frame, ...)opens a BUI window, creates the ImGui context, and callsframe()inside each ImGui frame until you close it. Ifframeraises, the window closes and the exception comes out ofrun.- Printf-style functions take one string:
imgui.text("%d items" % n).
C++: the classic demo
ImGui users know ShowDemoWindow(). Here it is on BUI:
#include "imgui.h"#include "imgui_impl_bui.h"
static void frame(void*) { ImGui::ShowDemoWindow(); }
int main() { ImGui::CreateContext(); ImGui_ImplBUI_App* app = ImGui_ImplBUI_CreateApp("Dear ImGui on BUI", 1280, 800, frame, nullptr); ImGui_ImplBUI_RunApp(app); // BUI's message loop until the window closes ImGui_ImplBUI_DestroyApp(app); ImGui::DestroyContext();}imgui.his Dear ImGui’s own header.imgui_impl_bui.his BUI’s backend: the piece that connects ImGui to a window and a renderer.ImGui_ImplBUI_CreateAppopens a window and calls yourframefunction for each ImGui frame. The last argument is a pointer that’s handed back toframe, for your state.- In CMake, link
bui::imgui.
The repository’s fuller version is examples/imgui_demo.cpp. Build it from a clone with CMake:
cmake -S . -B buildcmake --build build --target bui_imgui_demoThen run bui_imgui_demo from the build folder. With --screenshot out.png it renders a few frames headless and writes a PNG instead of opening a window, and BUI_GPU=1 draws the window on the GPU.
Blender’s widgets, with one flag
So far, the widgets are ImGui’s, wearing Blender’s colors. BUI can go further: build it with BUI_IMGUI_BLENDER_WIDGETS=ON and ImGui’s widgets are drawn by BUI’s own Blender widget code: buttons, checkboxes, sliders, number fields, text fields, combos and color edits. Number fields, sliders and checkboxes also follow Blender’s interaction rules. Your ImGui code doesn’t change.
cmake -S . -B build -DBUI_IMGUI_BLENDER_WIDGETS=ONcmake --build build --target bui_imgui_demoIn Rust, it’s the blender-widgets feature of the blenderui-imgui crate.
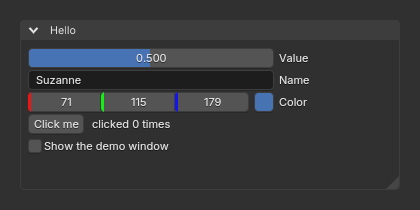
What you’ll notice when you use them:
- Sliders don’t jump to where you click. Dragging is relative to where you pressed, as in Blender, and Shift moves at a twentieth of the speed.
- Drag fields scrub like Blender’s number fields: Shift for precision, Ctrl to snap, and a click (or Ctrl+click) to type a value.
- Checkboxes toggle on press, and you can drag across several to set them all.
The switch also works at run time when the build includes the widgets: imgui.set_blender_widgets(False) in Python, ImGui_ImplBUI_SetBlenderWidgets(false) in C++. imgui.has_blender_widgets() tells you whether your build has them. The wheels on PyPI are built without this option, so in Python you get Blender’s widgets from a source build with the flag on.
Next steps
Last updated