
Your first app, in Python
Build a small Blender-style tool window with BUI's components, one line at a time. About ten minutes, no Blender required.
- 10 minutes
- Beginner
- Python
In about ten minutes you’ll have a real window with a Blender panel, a slider you can drag, a checkbox, a color picker, a button and a pie menu. It takes about 20 lines of Python, and you’ll understand every one of them.
We’ll use BUI’s Blender components: Python classes like Panel and NumberSlider that map one-to-one to Blender’s own widgets.
The finished app
Here’s where we’re heading. Don’t worry about reading it all now; we’ll build it piece by piece.
from blenderui.components import (App, Panel, NumberSlider, Checkbox,                                  ColorSwatch, Button, MenuItem, PieMenu)
def on_size(value):    print("size is now", value)
size = NumberSlider("Size", 1.0, min=0, max=10, on_change=on_size,                    description="How big the object is")smooth = Checkbox("Smooth", True)color = ColorSwatch("Color", (0.8, 0.3, 0.1, 1.0))
def apply():    print("apply:", size.value, smooth.value, color.value)
app = App("My first BUI app", (360, 300),          Panel("Object", size, smooth, color),          Button("Apply", on_click=apply))
app.bind("q", lambda: PieMenu.show(app.ctx, [MenuItem("Object Mode"),                                             MenuItem("Edit Mode")], "Mode"))app.run()
Build it, step by step
-
Open an empty window.
Create a file called
first_app.pywith three lines:first_app.py from blenderui.components import AppApp("My first BUI app", (360, 300)).run()Run it with
python first_app.py. An empty, dark window appears.Appis your window. Its first argument is the title, the second is the size in pixels (width, height)..run()opens the window and starts the event loop: the part that waits for clicks and keys and keeps the window alive. Your script stays on this line until you close the window.
-
Add a panel with a slider.
first_app.py from blenderui.components import App, Panel, NumberSliderApp("My first BUI app", (360, 300),Panel("Object", NumberSlider("Size", 1.0, min=0, max=10))).run()- A
Panelis Blender’s collapsible box with a title. Everything after the title goes inside it. - A
NumberSlideris Blender’s slider: a label, a starting value (1.0) and limits (min,max).
Run it again and drag the slider. Then click its header arrow: the panel collapses with Blender’s animation.
- A
-
React when the value changes.
Widgets tell you about changes through callbacks: functions you hand over, which BUI calls later.
def on_size(value):print("size is now", value)size = NumberSlider("Size", 1.0, min=0, max=10, on_change=on_size,description="How big the object is")on_change=on_sizemeans “callon_sizewith the new value whenever it changes”. Drag the slider and watch your terminal.description=is the tooltip. Hover over the slider for a moment to see it.
We also gave the slider a name,
size, so we can read it later. -
Add a checkbox and a color.
smooth = Checkbox("Smooth", True)color = ColorSwatch("Color", (0.8, 0.3, 0.1, 1.0))Checkboxtakes a label and whether it starts checked.ColorSwatchtakes a label and a color as (red, green, blue, alpha), each from 0 to 1. Click it in the app: you get Blender’s color picker, with the HSV wheel, a hex field and an eyedropper.
Put all three in the panel:
Panel("Object", size, smooth, color). -
Add a button that reads everything.
def apply():print("apply:", size.value, smooth.value, color.value)Every value component has a
.valueyou can read (or set) at any time. Pass the function to a button withButton("Apply", on_click=apply), after the panel. -
Add a pie menu.
app.bind("q", lambda: PieMenu.show(app.ctx, [MenuItem("Object Mode"),MenuItem("Edit Mode")], "Mode"))app.bind("q", ...)runs a function when you press Q in the window. It understands combinations too, like"ctrl+s".PieMenu.show(...)opens a Blender pie menu at the pointer with the items you give it.
To call
bind, we need the app in a variable, so the last lines becomeapp = App(...), thenapp.bind(...), thenapp.run(). That’s the finished file from the top of the page.
Run it
python first_app.pyYou’ll see one panel titled Object with the slider, the checkbox and the color, and an Apply button below it.
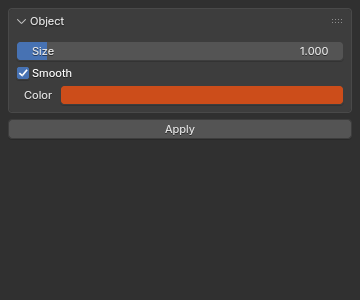
first_app.py, rendered by BUI at its real size (360 × 300). Want to see more parts together? Run examples/components_demo.py.Now play. Each of these works without a single extra line of code:
- Drag the slider. Hold Shift for fine control, Ctrl to snap.
- Click the slider and type
2*pior10/4, then press Enter. - Hover the slider and press Ctrl+Wheel to step it, or Backspace to reset it.
- Right-click any value for Copy, Paste and Reset.
- Press Ctrl+Z to undo your last edit, and Ctrl+Shift+Z to redo.
- Press Q for the pie menu, then flick toward a choice.
What just happened
You described what the window contains, and BUI did the rest. Your Python code built a small tree: an app, holding a panel and a button; the panel holding three widgets. That tree went to BUI’s C runtime, the kit, which:
- laid the widgets out like Blender’s properties editor,
- drew them with a port of Blender’s widget code,
- handled the mouse and keyboard with Blender’s rules (everything you just tried), and
- called your Python functions only when something changed.
When nothing changes, the window costs no CPU at all. When you drag, BUI redraws only the slider, not the whole window.
Where to go from here
- Change the layout. Put widgets side by side with
Row(...), or line up X/Y/Z fields withVectorField("Location", (0.0, 1.25, 0.0)). - Add a menu bar. Pass
header=MenuBar(...)toApp. - Test it without a window.
app.render_raster()draws headlessly, andapp.press(...)/app.release(...)simulate input. Handy for tests.
Next steps
Last updated